We kind of went whole-hog with this project, since it was for the catalog cover, and to show how to use different types of embellishment. You can certainly skip some of the steps and materials to suit your taste and budget. This design is pretty fancy so makes a great project for yourself or for a gift for someone really special.
Shopping list:
- An item to work on - we used Feminine Fit Softee Long Sleeve shirt
- Detergents - optional
- Fabrico Dual-tip Marker - We used Black
- Lumiere & Neopaque Fabric Paint - We used #588, #544, and #563
- Glitter Glue
- Jones Tones Fabric Paint - We used #779
- DecoFabric Glitter Marker - We used #31
- iCraft Deco Foil - We used Silver
- Jones Tones Glitter - We used #854
- Hot-Fix Applicator
- Non-stick Craft Sheet
- Tweezers
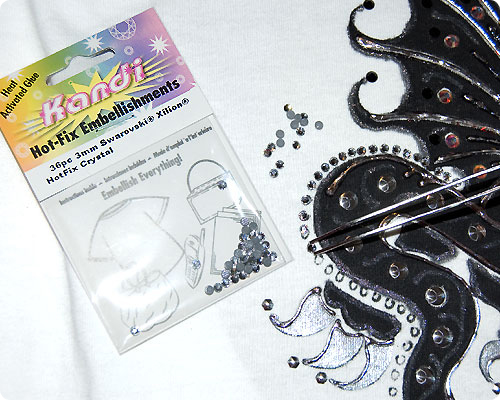
- Swarovski Xilion Hotfix Crystals & Hotfix Nailheads - We used 3mm White Crystal (#SC3), 4mm Jet Black (#SC4), 5mm Crystal AB (#SC5), Hexagon Nailheads in 4mm Silver, and 6MM Round Nailheads in Silver (#NHR6)
Let's get started!
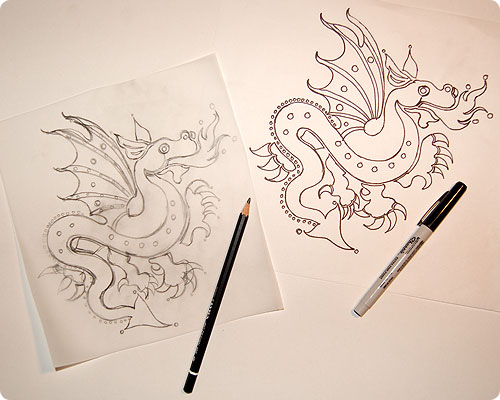
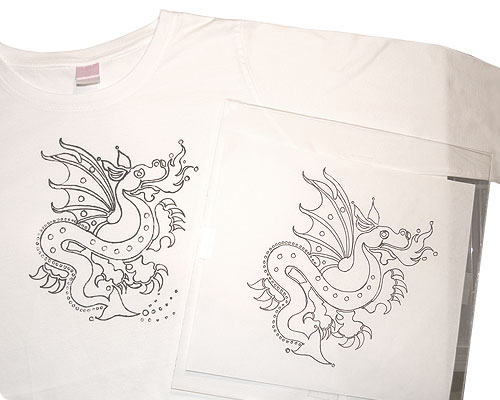
1. Prewash shirt (in Kieralon). Draw your own dragon or trace from a reference book about dragons. Enlarge the design, if necessary, to desired size for your shirt. There are many ways to do this - Xerox, copy machine, computer, Projectascope, etc. Draw the design with a graphite pencil or with a sharpie black marker. Let the marker drawing dry so that you don't transfer ink to your shirt.
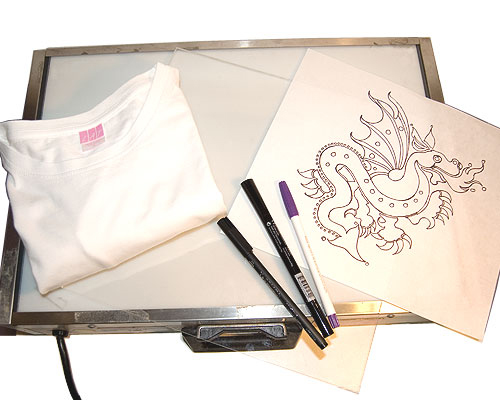
2. There are many ways to transfer the design to the shirt. I used a light table I already had (from a photographic supply store) and a clear 12 inch square acrylic sheet (from a scrapbooking craft store). For drawing the lines on the shirt, I used the Fabrico Dual-tip Marker in black. You could also opt for using the #FM Fabricmate Marker or the #EFMN Vanishing Fabric Marker for your design.
3. Tape your drawing onto the clear acrylic plastic sheet and slide it inside your shirt. The acrylic sheet will protect your shirt from ink transferring to the backside. Lay the shirt onto the light table. You can see your drawing as the light shines through the clear acrylic. You can also simulate this by drawing on the top of a glass table that has a lamp placed under the table.
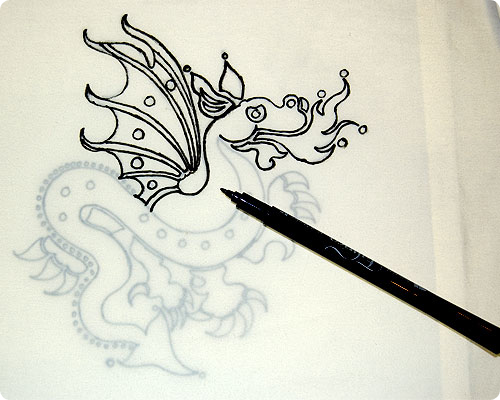
4. Draw design onto your shirt with the #FDFM Fabrico Dual-tip Marker in black.
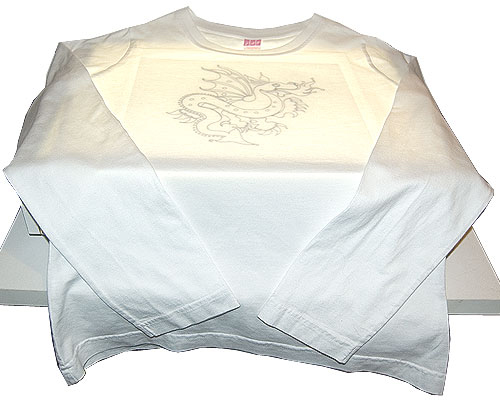
5. After you finish your drawing, let the marker dry completely. Heatset the marker drawing on your shirt with an iron.
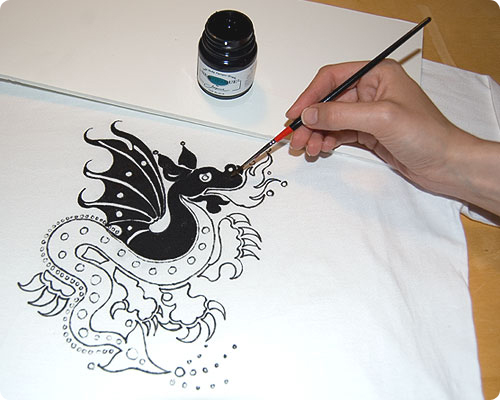
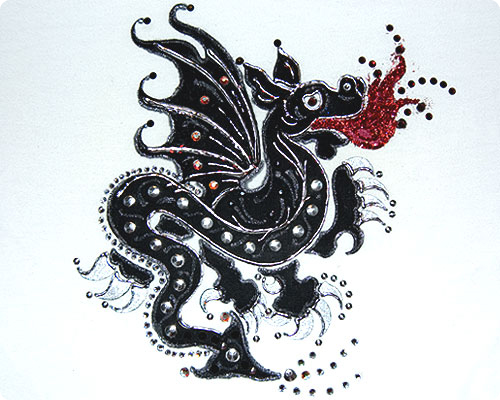
6. Paint the dragon's black body parts with #LN2 Neopaque Fabric Paint in 588 Black.
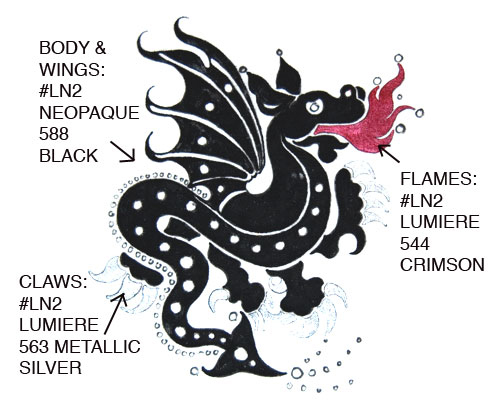
7. Paint the flame coming from the dragon's mouth #LN2 Lumiere Fabric Paint in Crimson 544. Paint the dragon's claws with #LN2 Lumiere Fabric Paint in Metallic Silver 563. Let all paint colors dry and heatset with an iron.

8. Apply #JTG4 402 Jones Tones Foil Glue to areas where you want the fabulous silver foil to adhere. Let the glue totally dry - it will be tacky. I used a big inverted bowl over the design to protect it from airborne dust.
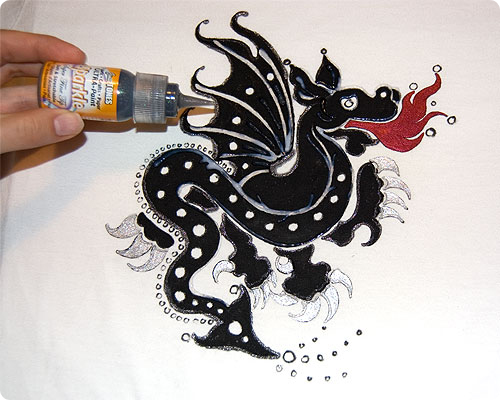
9. I added some # JT2 Jones Tones Glitter Tones in 779 Black Lites to areas on the wings and body. The Silver Foil will stick to this slightly for an interesting look or you could skip this step or wait till after the foiling to add this glitter product. Nice subtle effect.
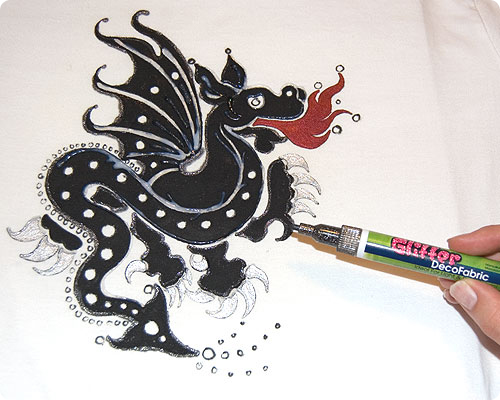
10. Optional - while waiting for the Jones Tones glue to dry, I embellished my drawing with #MOFM DecoFabric Glitter Marker in black 31 to give it more interest and depth. Let dry and heatset with an iron. You should do this step right after step 7 to be able to heatset it easily.
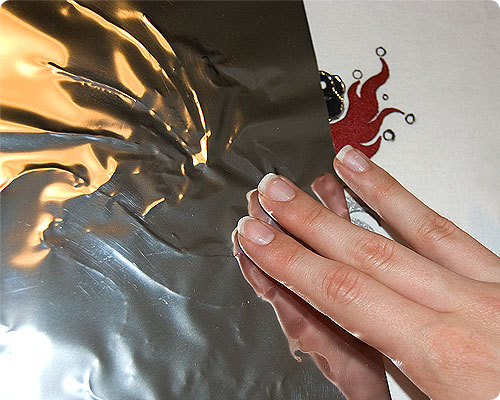
11. Apply the #IDF6 iCraft Deco Foil in Silver to adhere to all the areas you used the dry but tacky Jones Tones Foil Glue. Lay the foil sheet over the raised glue areas and firmly rub. Easy! Make sure to rub along the sides of the glue lines to have the foiling go right down to the glue edges.
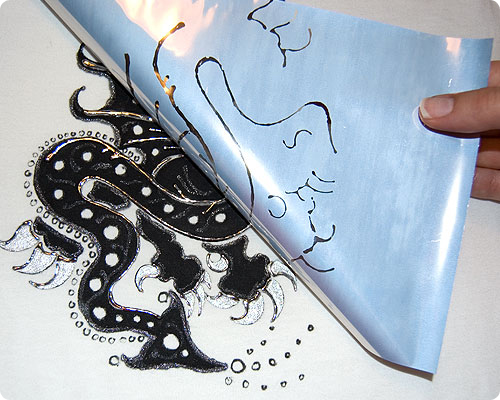
12. This part is so fun it's addictive. Peel away the foil sheet to reveal... Ta-Daa!... highly metallic silver foil lines now on your shirt. If you missed any areas, simply lay the foil sheet over the dried glue and rub again.
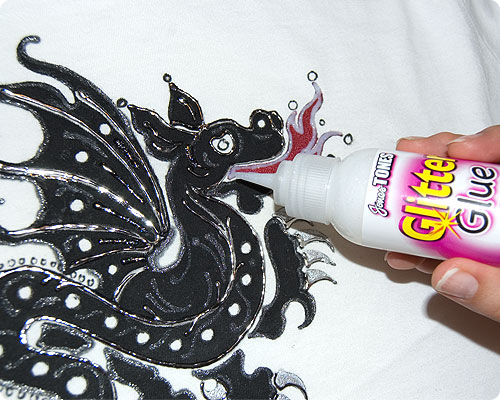
13. Draw the outline (and/or fill in the center) of the mouth flame with Glitter Glue.
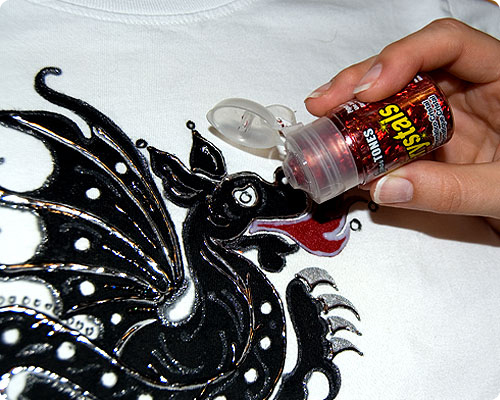
14. Sprinkle some glitter onto the wet glitter glue areas. Let dry for a few hours. Do not blow on the glitter areas or shake off the excess glitter until the glue is dry (a few hours).
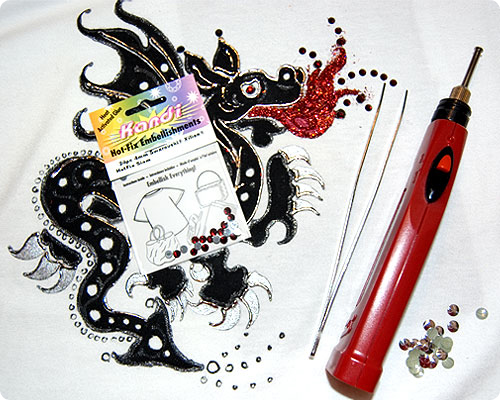
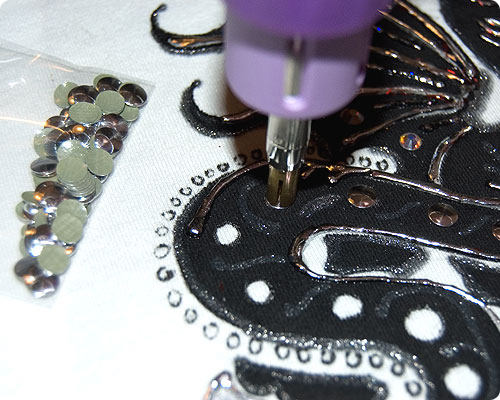
15. To apply all our Hot-Fix Embellishments, you'll need a Hot-Fix Applicator (#RSHA), a Non-stick Craft Sheet (to protect your surfaces from excess glue), tweezers (believe me these really help), and your chosen Hot-Fix crystals and nailheads.
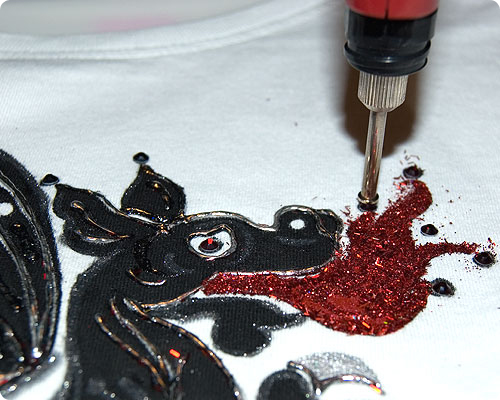
16. Place the Non-stick Craft Sheet under the shirt in the areas that you'll be adhering the Hot-Fix embellishments. Position with tweezers the #SC4 Swarovski Xilion Hotfix Crystals in 4mm Siam Red to the flame tips and the dragon eye. Now using the Hot-Fix applicator, which heats up and melts the glue backing on the crystals within seconds, adhere the crystals to the shirt.
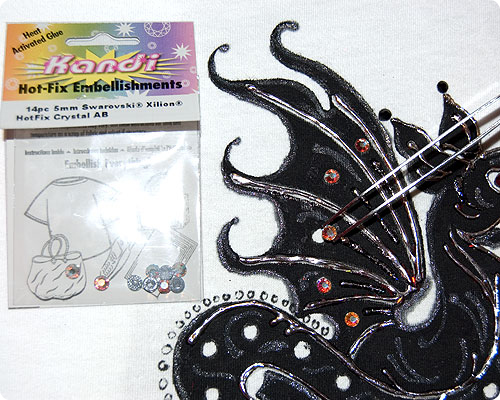
17. Position the larger sized #SC5 Swarovski Xilion Hotfix Crystals in 5mm Crystal AB (aurora borealis) to the wings. The tweezers make handling and placing the crystals much easier. Now using the Hot-Fix applicator, which heats up and melts the glue backing on the crystals within seconds, adhere the crystals to the shirt (as shown in step 16).
18. Position the large sized #NHR6 Hotfix 6MM Round Nailheads in Silver to the dragon's chest & tail. (Nailheads also come in Gold).
19. Now using the Hot-Fix applicator, adhere the nailheads to the shirt.
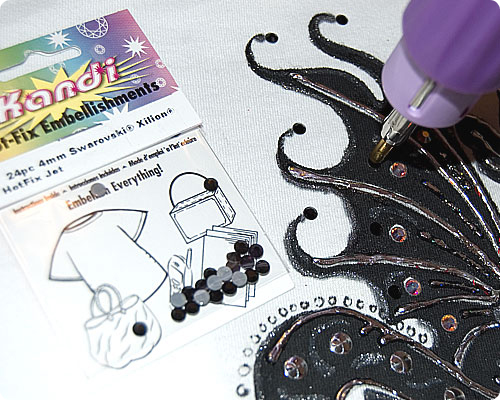
20. Position the #SC4 Swarovski Xilion Hotfix Crystals in 4mm Jet Black to the wing tips and the dragon body & tail. Use the Hot-Fix applicator to adhere the crystals to the shirt.
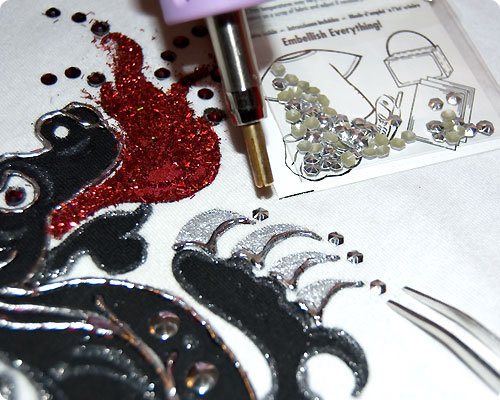
21. Position the Hotfix 4MM Hexagon Nailheads in 4mm Silver to the dragon's claw. Use the Hot-Fix applicator to adhere the nailheads to the shirt.
22. Position the small #SC3 Swarovski Xilion Hotfix Crystals in 3mm White Crystal to the dragon back & tail. Use the Hot-Fix applicator to adhere the crystals to the shirt.
23. Finally, add extra crystals from your stash wherever you like on your shirt and adhere with the Hot-Fix Applicator. The shine, glitter and metallic luster of this shirt cannot be captured in photography. Looks fabulous in person! Use this project as a sampling of what's possible with these products. You can embellish a garment a little or a lot to suit your mood or taste.