


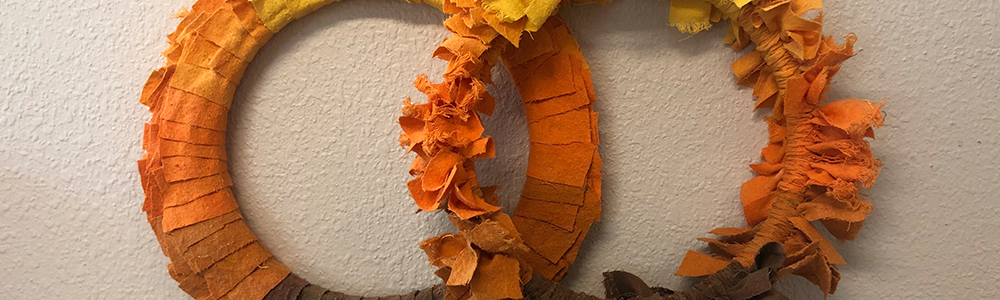
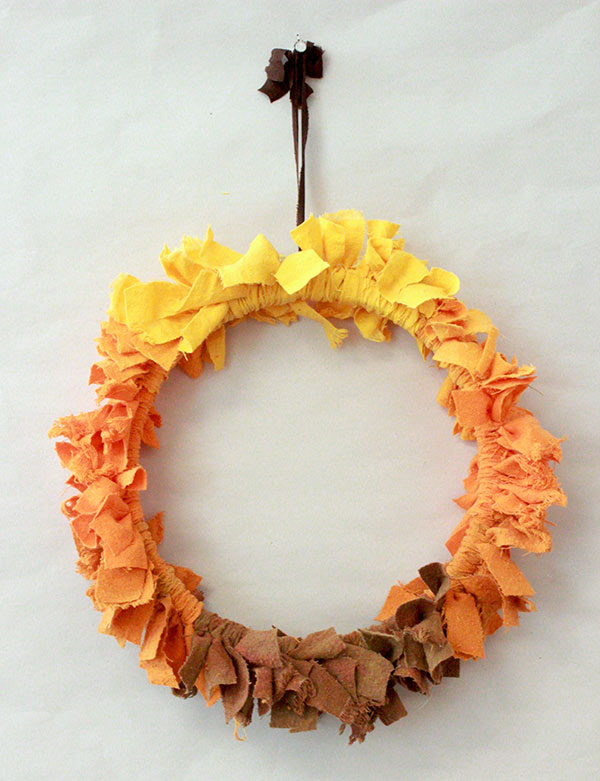
Fall Ombre Wreath Tutorial
One of my favorite school projects as a kid was making a toilet paper wreath. All it took was a wire coat hanger and a few rolls of toilet paper. From that came a beautiful, white, fluffy holiday wreath. I had the same thing in mind when I started this project. Originally I was only going to do that same process, which involves dyeing each strip of fabric around a circle base . However I had so much extra dyed fabric I thought why not include another method in this tutorial.
Any fabric will work for this wreath although note that the style will change depending on whether you go with a cotton fabric, silk, velvet, etc. I grabbed a fabric from our scrap bin that has a nice drape to it. You can choose to either solid color dye the fabric, not dye the fabric at all, or tie dye or Ombre dye. I chose to Ombre dye because I love when colors subtly fade into one another (to me it really elevates the aesthetic). Also, Ombre is a style of dyeing that can be used year round for all kinds of festivities and holidays. I'll show you how to make a fun fall wreath using all of our favorite autumnal earth tones in two separate applications.
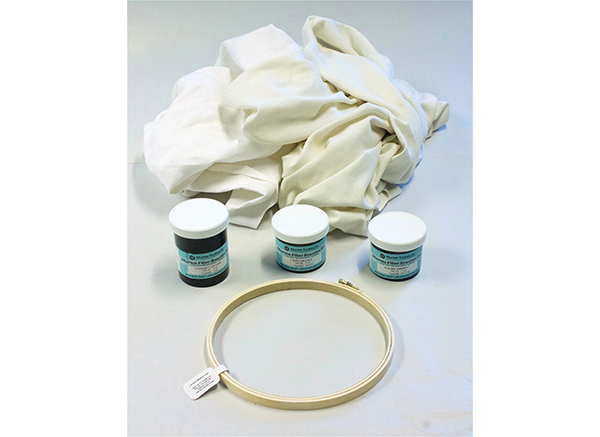
Supplies:
- 8" Wooden Embroidery Hoop ( you can use the 10" I was trying to save time by making it smaller and then I ended up making two, go figure)
- Dharma Fiber Reactive Dyes (we used dye #'s 3, 5 and 35)
- Fabric Scraps
- Scissors
- Ribbon or cord to hang when done
- Hot glue for the 2nd method
Let's get started!
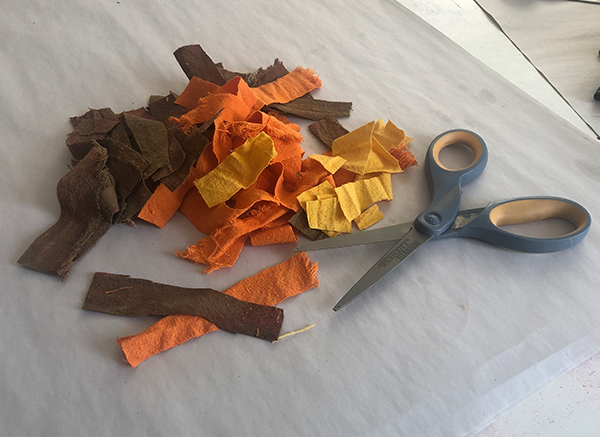
Dye your fabric scraps using the following ombre dyeing method...or you can use my less meticulous method. I set up 3 dye baths (one yellow, one orange and one brown). I then added fabric to all three but especially added extra fabric to both the yellow and orange baths. Once dyed I pulled the extra scrap from the yellow and dipped it in the orange, then pulled the extra scrap out of the orange and dipped it in the brown. This helped me achieve the look of the colors fading into each other. The next step involves cutting the fabric into smaller pieces so it didn't seem too important to have that extra clean ombre fade.
Once the fabric scraps are completely dry, cut them into smaller pieces (roughly 6" long x 1" wide). It definitely is not important to have them perfect, though be careful not to cut them too short.
Method 1
For this method, I tied fabric pieces around both the hoops. I started at the bottom of the wooden hoop with the brown fabric pieces and tied each one closely together. I then worked my way up on both sides of the hoop, continuing to tie the fabric pieces on the outer ring as I went. After each piece I'd push them together as much as possible to avoid spaces in between pieces. I just tied it around once and they were very sturdy so I didn't see the need to use glue to hold it in place.
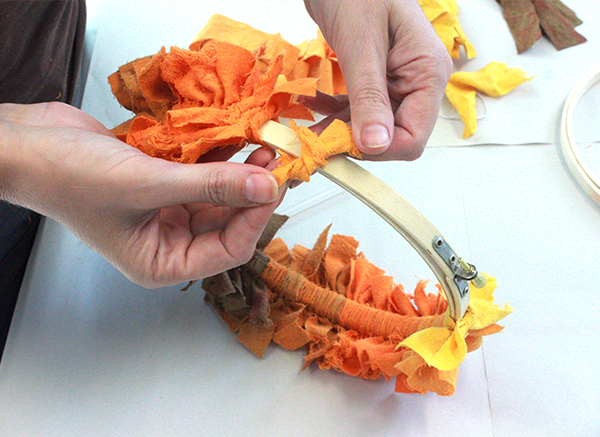
Lastly, the wooden hoop has a screw on top which I used to attach a ribbon in order to hang the completed wreath.
Method 2
For this method I first separated the two hoops and tied fabric around both the inner ring and the outer ring. I then started by hot gluing the brown fabric pieces onto the bottom exterior of the outer ring and working my way to the top with the other colors. I did two layers of fabric scraps for the outer ring and then cut them in layers to give a fuller look.
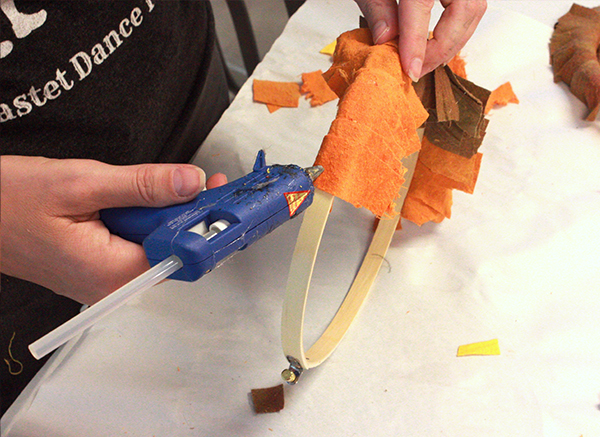
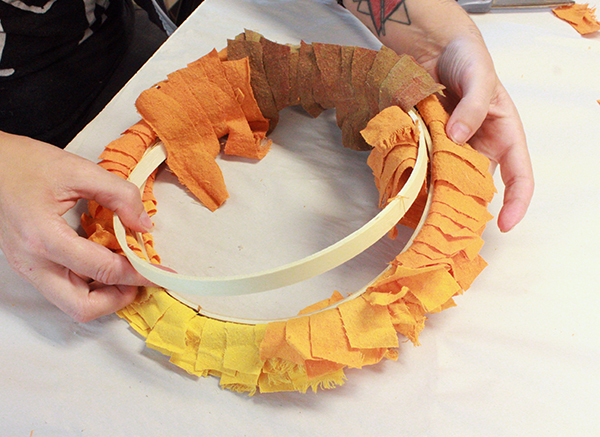
I placed the inner ring back into the outer hoop and tighten the screw (I also used some hot glue to keep it in place). Once again I started at the bottom of the inner ring by adding brown fabric and working my way to the top. This time you glue the pieces in the inner ring so they hang over the bottom layer you previously created. I cut these pieces even shorter for a more full, layered look and then used the glue to attach them to the bottom layers. Just a little bit of glue goes a long way so I suggest to use it sparingly.

(The next part is optional) I glued the fabric pieces on opposites sides together because I didn't want the top to appear limp. You can definitely opt to cut the pieces shorter and use more layers to give it an even fuller look. I was just playing around with this one and so can you!

For both methods, the wooden hoops have a screw on top which I used to attach a ribbon in order to hang the completed wreath. Hang your ombre wreath on the front door or anywhere for a welcoming display.


