


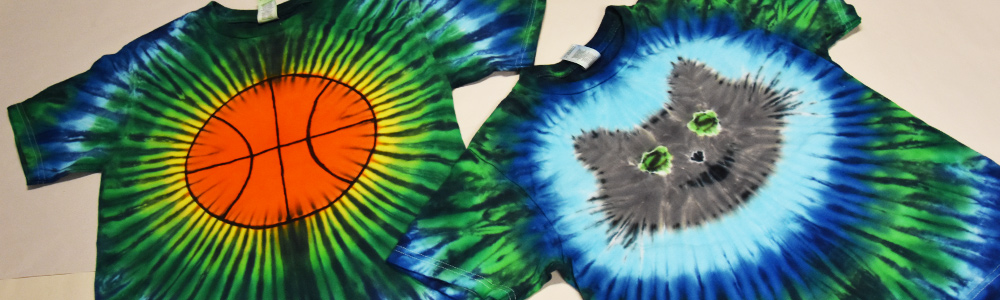
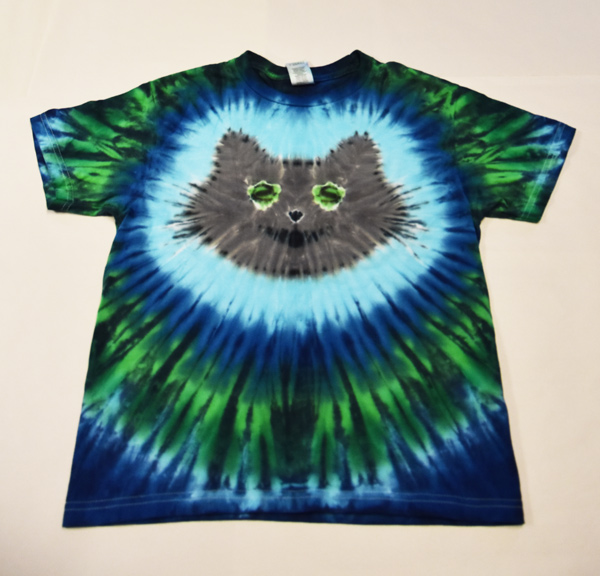
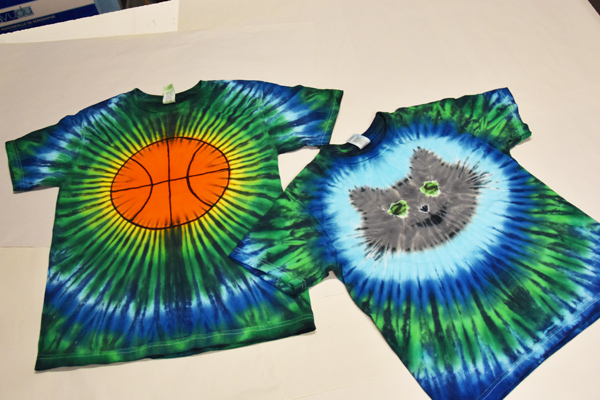
Cat and Basketball Tie-Dye Tutorial
a Dharma featured tutorial
These two styles of tie-dye make great gifts for adults and kids. They are fairly easy, just make sure to follow the steps with our helpful hints and take your time. The cat's face is slightly more complicated than the basketball because of the nose and eyes; but you can also draw them on later with a fabric maker. It might be good to give it a practice run on an old shirt first. These are such fun designs and can be modified for many other designs with a little playing around.
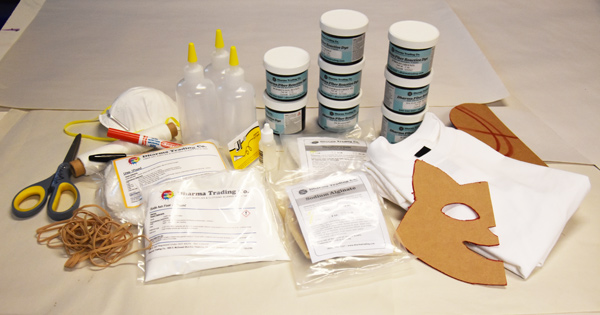
Supplies:
- Basic Tie-dye directions (includes links to supplies)
- Dharma Fiber Reactive Dyes (For the basketball we used #'s 6, 23A, 29, 30A, 80, 160 & 165. For the cat we used #'s 23A, 29, 30A, 44, 80, 154 & 160)
- Glauber's Salt (To give a more intense color to any colors mixed with Turquoise)
- T-Shirt to Tie-Dye
- Sodium Alginate Thickener (SA4 HV)
- Gutta Applicator Bottles With Metal Tips (GAMT #7)
- Scissors
- Sinew, Rubber Bands or kite string
- Washable Marker (We found the red bleeds less)
- Black Sharpie
- Dust Mask
- Cardboard design cut out
- Ruler (A thin metal yardstick works the best)
- A dime (or small round object for the eye)
Let's get started!
Using the Basic Tie-Dye directions, we have a few useful hints to add:
- Using an immersion blender mixes the dye thoroughly and will save a lot of time.
- Adding a tablespoon of Glauber's Salt (per 8 oz) to Fiber Reactive Colors #23A, 29, 30A and 80 will help those colors pop.
- Automotive funnels have mesh filters, using them to transfer the mixed dyes into squeeze bottles will screen out any undissolved dye that will clog the yorker spout tips.
- Pre Soaking the shirts in Soda Ash and spinning them dry before making the pleats will help you get those nice sharp folds. Just make sure the spin cycle isn't also rinsing, which will remove the soda ash!
Basketball:
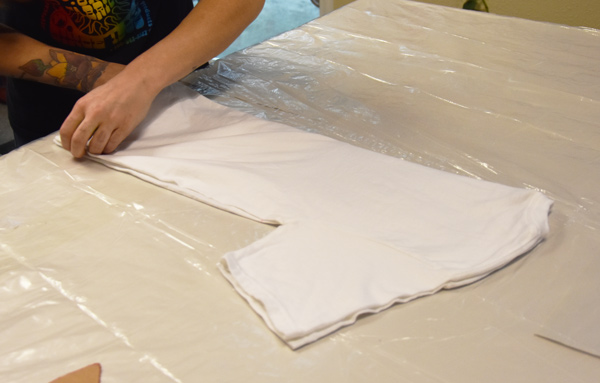
Lay your shirt flat, front side up, and put the ruler in the middle of the shirt. Fold the shirt in half by taking the left side to match the right side. Once you've got a perfect even fold carefully slide out the ruler.
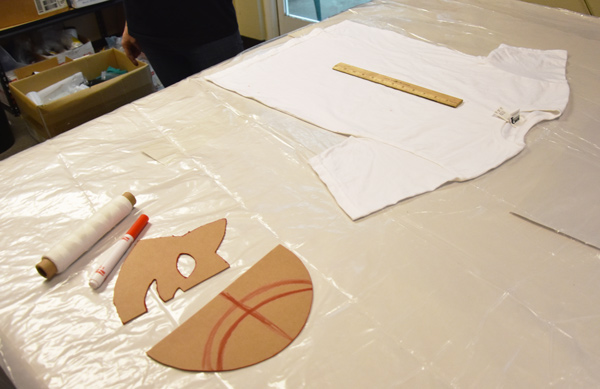
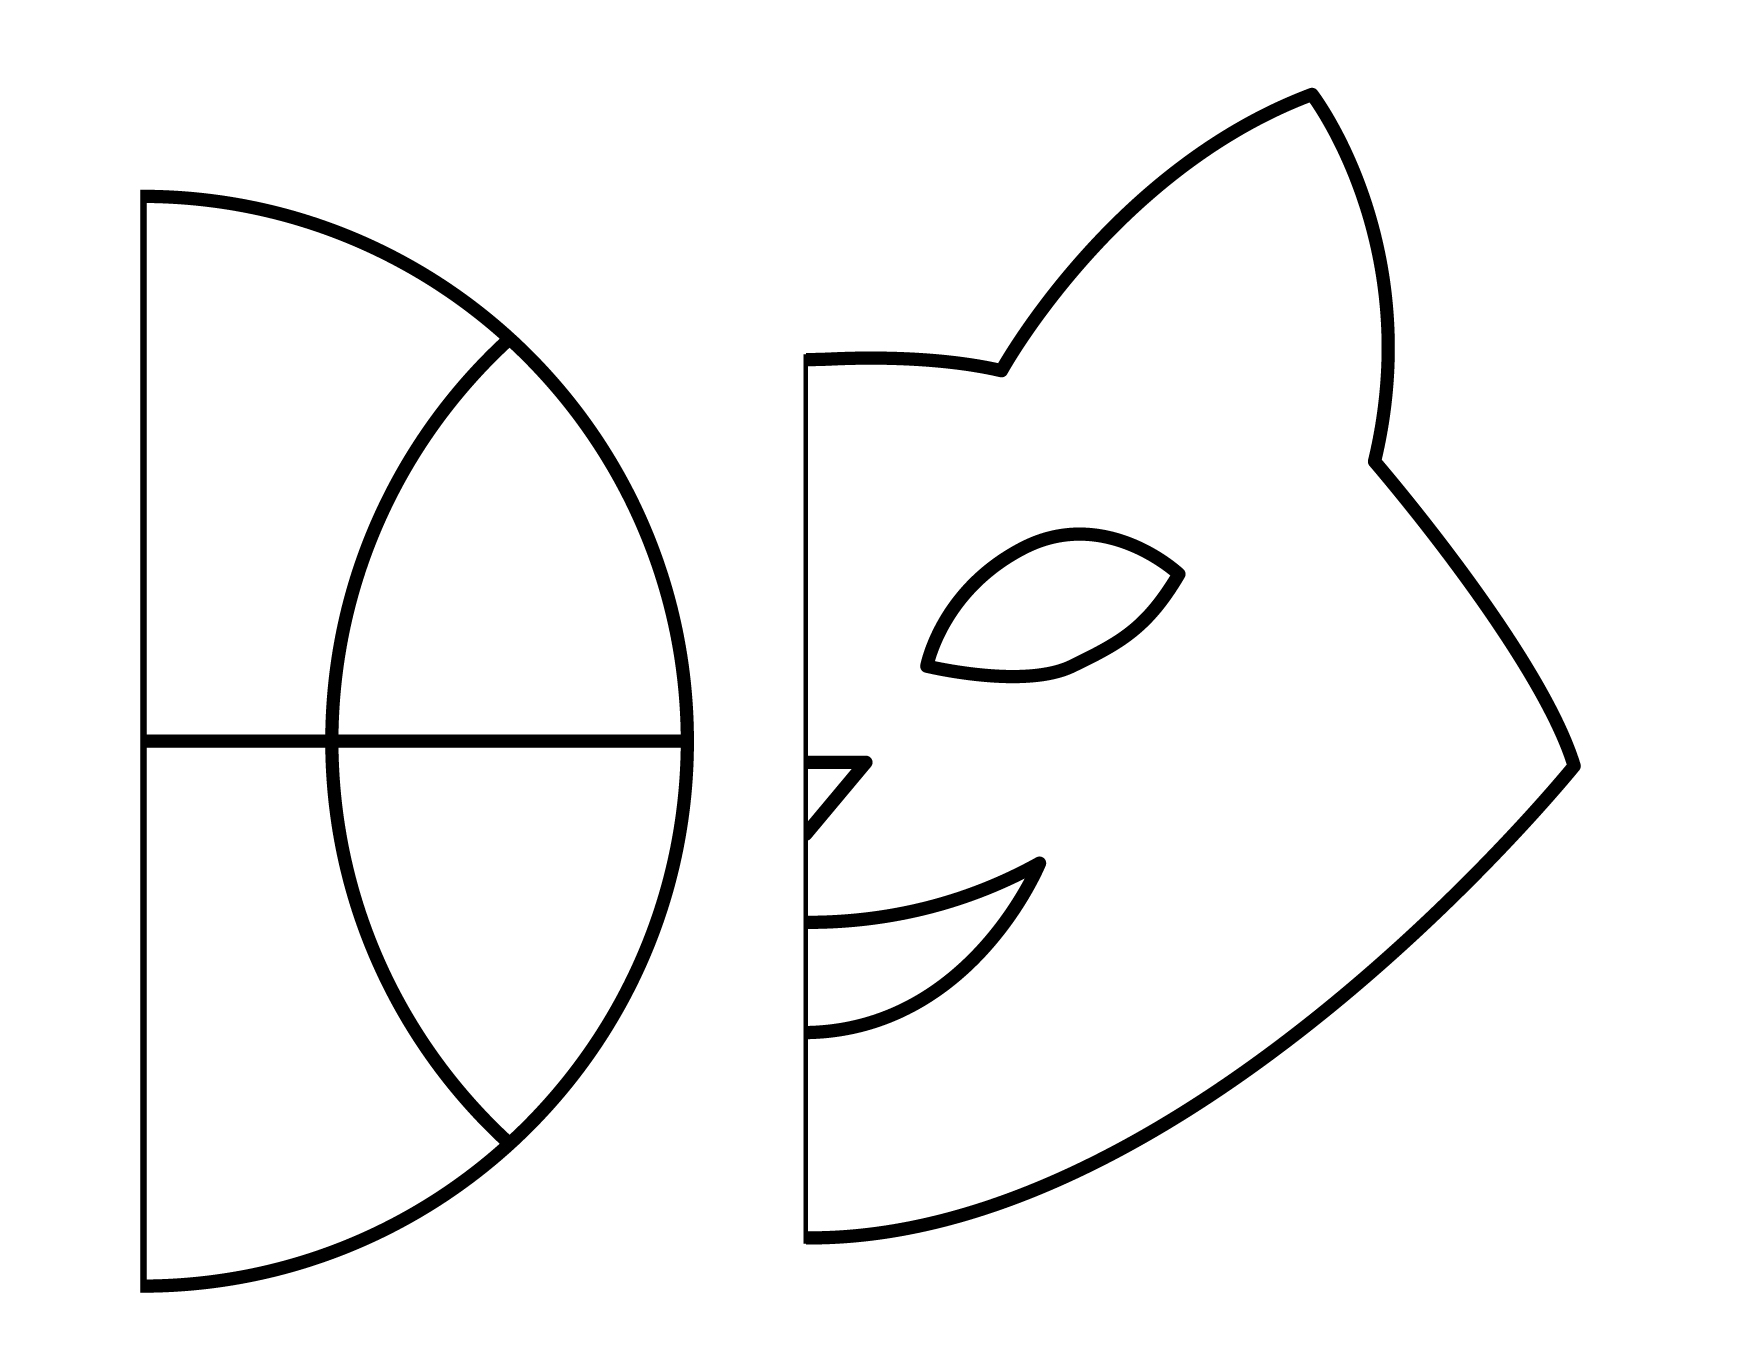
Place the half basketball stencil on the shirt. Line up the flat edges of the stencil and middle part of the shirt and use the washable marker to outline. Be careful not to place the design too low.
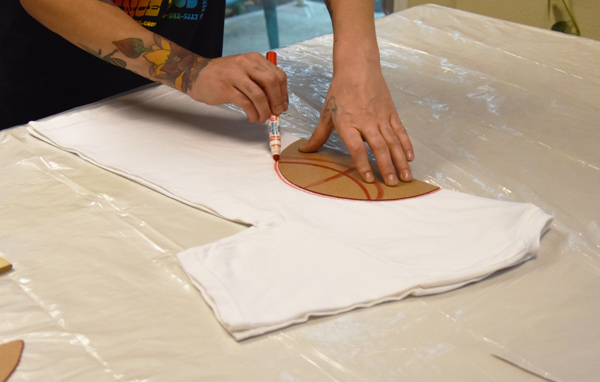
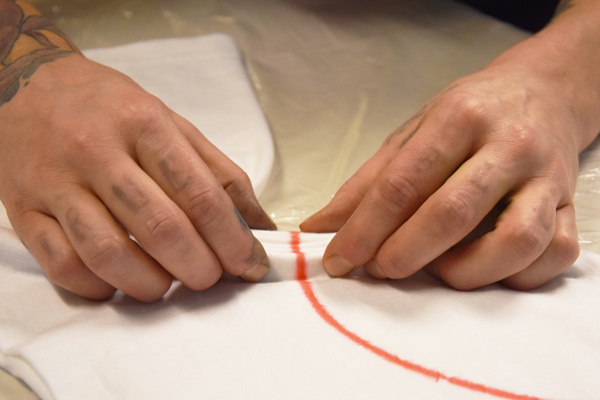
Start pleating along the top or bottom of the half circle and follow the line all the way around. Once finished use the sinew around the outline. Keep in mind you want it secure but the tighter you make it the more white there will be in the area around the basketball design.
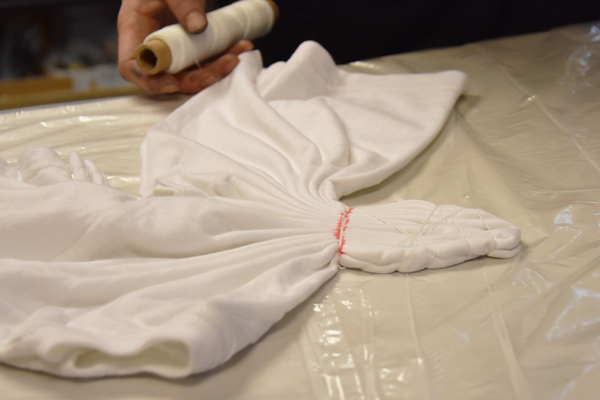
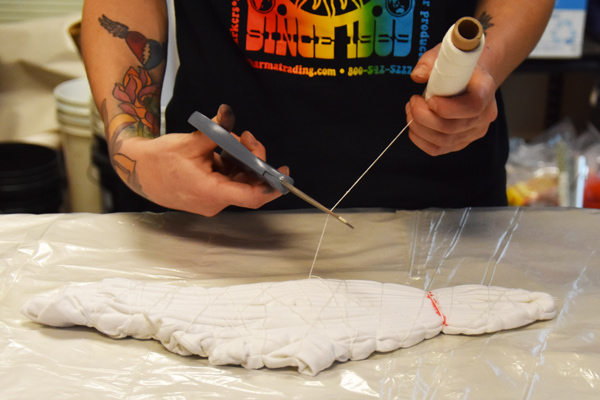
Time to finish pleating the rest of the shirt. Follow the pleats already made around the basketball design, lightly pulling as you go to help the folds come naturally. Once finished wrap the sinew around the rest of the shirt (don't lift the shirt or let go of the pleats) by sliding the string under and making some criss crosses. It's important to secure the shirt because you will need to flip it and it needs to be structurally sound.
Once the string is tied make sure there are no loose strings ends, this can cause unwanted bleeding. Optional: use a dowel or paper towel tube to roll lightly on shirt to compress pleats.
Now for the fun...dye application! Using a bin and rack is the easiest method we've found in order to keep the shirt from sitting in a puddle of left over dye. For the basketball area we used Deep Orange to the string, but not past. The next color after the basketball is Daffodil which is applied past the string line. Do not try and blend the orange and yellow. The lighter color will give the basketball a glow effect. From here on out when applying each color make sure to give overlap so that the colors blend nicely together. The order of colors after the Daffodil are as follows: Bright Green, Emerald Green, Robins Egg, Electric Blue and back to Bright Green. Flip carefully and repeat.

Grab a stick or skewer to peak into the fold just to make sure the dye is fully saturated into the folds. Use the tips of your squirt bottles to get that dye into those folds if you don't want a lot of white.
If you like the darker colored "spider" vein effect, this next step is for you. Apply the Blueberry dye on the outside from the middle of the shirt down on both sides. Give it nice coverage, but just on the surface of the folds. There is no need to saturate it since we still want the lighter colors underneath to come through. See below in the Cat Shirt instructions for a picture of this part.
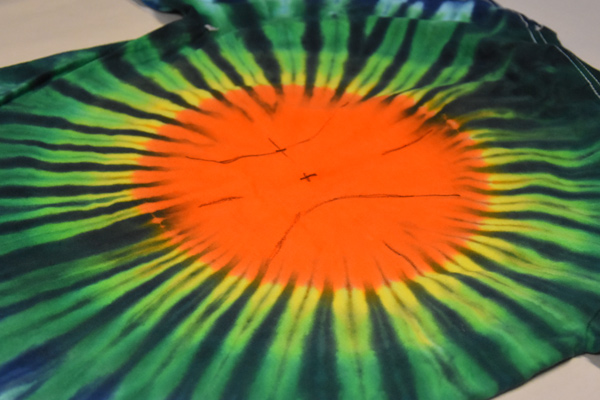
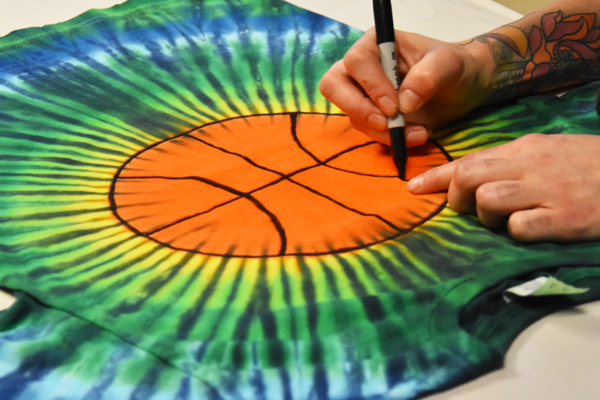
Lay on a tray with some newspaper to cure and then rinse and wash out per the basic tie-dye instructions. (We let this one sit for 2 days because it was cold in our warehouse. The colder it is, the longer it needs to cure.). Once washed and dried, draw in the lines of your basketball. Depending on what you use to draw your lines you might need paper in the shirt so it doesn't bleed through.
Cat:
Lay your shirt flat front side up and put the ruler in the middle of the shirt. Fold the shirt in half by taking the left side to match the right side. Once you've got a perfect even fold carefully slide out the ruler.
Place the half cat face stencil on the shirt. Line up the flat edges of the stencil and middle part of the shirt and use the washable marker to outline the face, eyes, nose, mouth and whiskers. Be careful not to place the design too low. You can also draw on the eyes, nose, mouth and whiskers with a fabric marker after the shirt is dyed and washed if you want to pass on using the thickened outliner dye. Artist's choice.
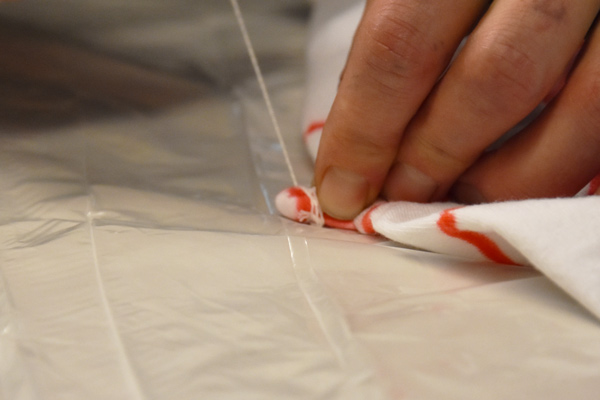
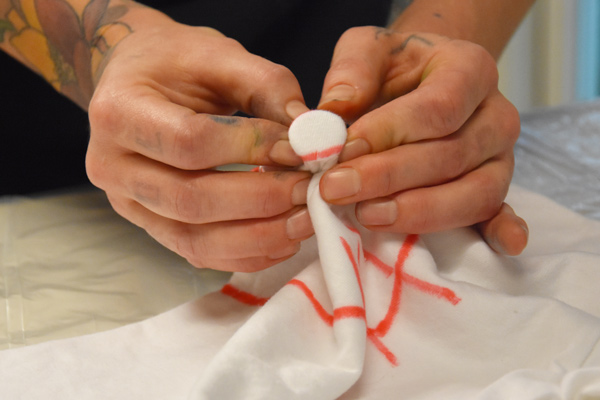
Start with bunching and tying the sinew tightly around the outline of the nose. Next place a dime (or something smaller if you have it) in the outline of the eye and wrap with the sinew tightly. Now it's time to pleat along the line of the cat's face, leaving the whiskers visible on top of the pleats. Make sure to take your time pleating, it's a more intricate design and requires a little bit of finesse. Once finished, use the string around the outline. Keep in mind you want it secure but the tighter you make it the more white there will be in the area around the cat design.

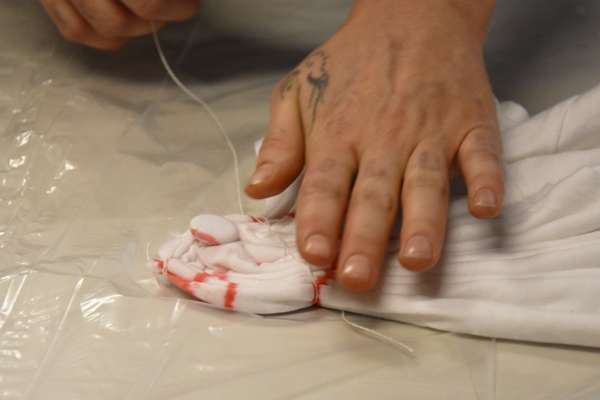
Time to finish pleating the rest of the shirt. Follow the pleats already made around the cat design, lightly pulling as you go to help the folds come naturally. Once finished, wrap the sinew around the rest of the shirt (don't lift the shirt or let go of the pleats) by sliding the string under and making some criss crosses. It's important to secure the shirt because you will need to flip it and it needs to be structurally sound.
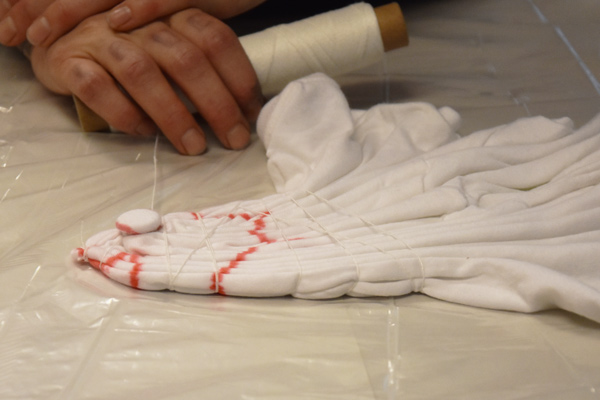
Once the string is tied make sure there are no loose strings hanging around because this can cause unwanted bleeding. Optional: use a dowel or paper towel tube to roll lightly on shirt to compress pleats.
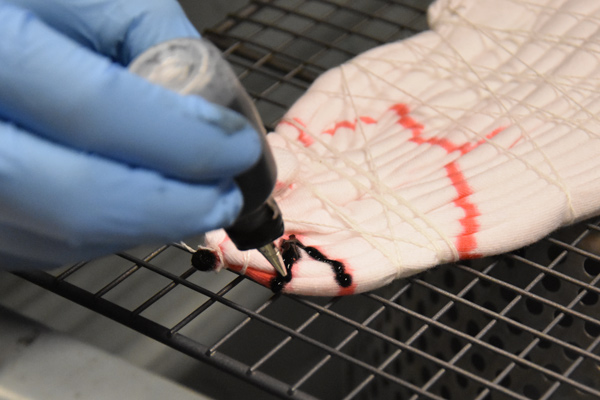
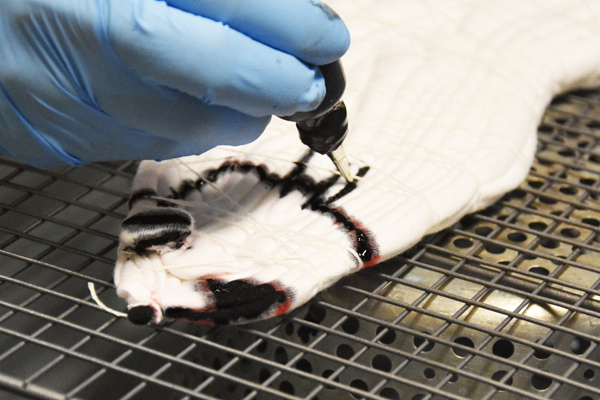
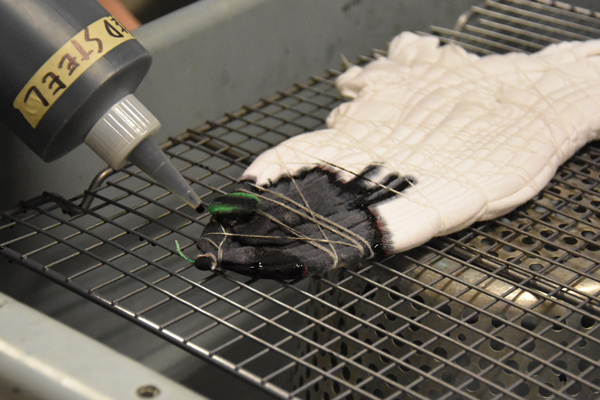
For the cat's face, we used a thickened black outliner using a recipe of: 8 oz hot water, 1/4 tsp alginate and 8 tsp black dye powder. We had a lot left over so it might be good to play around with cutting the recipe down. It works better if you let it sit overnight to thicken, but if it's too thick, add more premixed black dye. Apply outliner to the red line of the cat's eye and give it a line in the middle for a pupil. Follow the red lines of the nose and mouth filling in the empty spaces. Follow the outer red lines on the folds for the face outline and whiskers. The lines can seem wonky but just ignore that and hit as much of the red marker as you can. Flip carefully and repeat on the other side.
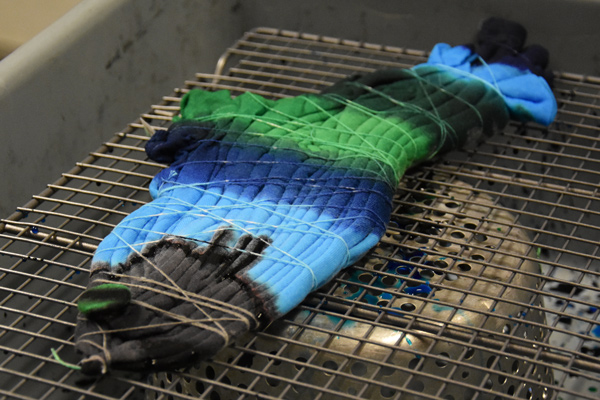
Now for the fun...dye application! Using a bin and rack is the easiest method we've found in order to keep the shirt from sitting in a puddle of left over dye. For the cat face we used Brushed Steel for the face (Green for the eye) up to the string area but not past it. The next color is Robin's Egg which is applied first after string to give the cat's face a glow effect. Do not blend the Brushed Steel and Robin's Egg together. From here on out when applying each color make sure to overlap so that the colors blend nicely together. The order of colors after the Robin's Egg is as follows: Electric Blue, Bright Green, Emerald Green, Robins Egg and once again Electric Blue. Carefully flip and repeat.
Grab a stick or skewer to peak into the fold just to make sure the dye is fully saturated into the folds and use the tips of the squeeze bottle to get the dye in those folds so you won't have a lot of white left.
If you like the darker colored "spider" effect this next step is for you. Apply the Blueberry dye on the outside from the middle of the shirt down on both sides. Give it nice coverage but just on the surface of the folds. There is no need to saturate it since you still want the lighter colors underneath to come through.
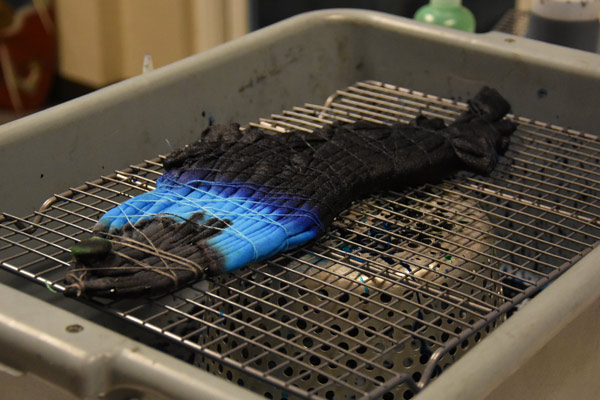
Lay on a tray with some newspaper to cure and then rinse and wash out per the basic tie-dye instructions. (We let this one sit for 2 days because it was cold in our warehouse. The colder it is, the longer it needs to cure.). Once washed and dried, draw in the rest of the face and whiskers if you did not do so with the outliner. Depending on what you use to draw your lines, you might need paper in the shirt so it doesn't bleed through.
If you need a little help with freehand drawing your basketball or cat we've got you covered. Here is a stencil outline for you to print at home. You may have to adjust the size on your printer depending on the garment you are using.


